
 I’ve been toying with cooking steak from the freezer for awhile now. I somewhat regularly cook hamburgers directly from the freezer, but let’s just say that steak hasn’t been wildly successful. Until last night. The steak was a perfect medium-rare, so you can have steak for dinner, even if you forget to take it out of the freezer! I was reading an old copy of Cook’s Illustrated® before pitching them for the move. Yes, I parted with some mighty good magazines, but this is the way of moving. Pitch before, not after the move! Some lessons are just more difficult than others, aren’t they? Anyway, I ran across this article on cooking steak directly from the freezer…do not thaw first, do not pass GO….
As I said, I regularly fry/grill burgers directly from the freezer, and we’ve always enjoyed them and never noticed an adverse flavor or texture. Quite the contrary. Anyway, those smart people explained the whys and wherefores of this method. It makes complete sense, when you think about it. Head over to their website and check it out. The idea is that you sear the steak on both sides over screaming high heat, then into the oven to finish cooking, and of course, thawing. I would say that a cast iron skillet works the best.
There are a couple of things that created problems for me, but I’ve resolved those now.
- It is imperative..imperative!!!…that when you freeze the steak(s), place them on a cookies sheet. lying completely flat. They need to be completely flat on both sides for this to be successful. This way there will be overall contact with the skillet/fat, so you’ll have even browning, otherwise, they won’t brown evenly and steam.
- About the fat, you’re going to need some, at least 1/8-inch. The first time I tried this, I skimped…it didn’t work well. Next, you want the steak(s) to be relatively free from ice. So if you have a frost-covered steak lurking in the back of your freezer, this isn’t going to work that well. The meat will steam, rather than sear.
- And finally, remember to “rest” the steak after it comes out of the oven, for at least 5 minutes, but 10 is even better.
- The final, final thing I want to mention, and frankly this applies to all steak; it should never, ever, ever be cooked past medium. If you want well-done beef, make pot roast or have a burger.
So this is what I did…Preheat the oven to 450°F…I actually used my toaster oven. I just got a new one, and it has a convection feature and it will hold my skillet just perfectly. So, I used that. Now the folks over at CI heat their oven to 275°F. I tried that and it took forever. Okay not forever, but about 35 minutes. When I used the much hotter oven, it took 8 minutes. We thought the taste, and more importantly, the texture, was better. So anyway, while the oven preheats,


season your “block of frozen meat” (steak), with at least salt and pepper. I’ve been using a blend I make with coffee and charcoal, but Montreal steak seasoning would be terrific, too. So you’ve seasoned the steak and preheated your oven, so now it’s time to put your skillet on the burner, over high heat. Yeah, turn that exhaust fan to HIGH! I used a combination of fats—olive oil, butter and bacon fat. You want to have about 1/8-inch of melted fat in the pan.
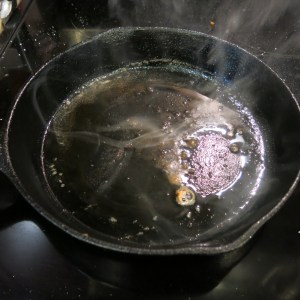

Just when it begins to smoke, gently plop the steak in the pan. It will hit with a thud and can splatter hot fat on you, so slide it in gently. But, it will spatter somewhat angrily. Leave it alone. Don’t move it for 90 seconds.
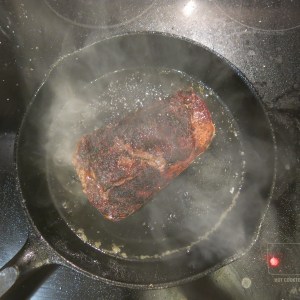

Use a tongs and turn the steak over. See how lovely and browned it is? Leave it on the second side for 90 seconds. Now, about 60 seconds into searing the second side, I dropped the sliced onions and peppers around the steak. When the timer beeped (and do set the timer, please), I slid the skillet into the oven for 8 minutes. I figured it would take longer than that, but nope! The internal temperature was 120°F on an instant read thermometer.  I pulled the skillet our of the oven (the onions and peppers were nicely wilted, but still had some texture), placed the skillet on a cold burner, draped it with foil and let it rest. Now, because the skillet was cast iron, it holds the heat, so the meat does continue to cook a bit. But after the rest, the meat was perfectly medium-rare. I purchase about an 8-10 ounce rib eye for the two of us. I cook it whole, then cut it in half after the resting period.
  It’s just the right amount for us and it was perfectly medium-rare…Yum!
This is perfect for one or two steaks, but I don’t see it working well for a crowd. Then, you’re much better off with a large hunk of meat that you either roast or grill. But no matter what, remember to rest, and then slice.
From-the-Freezer-to-the-Skillet Perfect Steak!
It is imperative that the steak is absolutely flat when freezing; placing the steak(s) on a cookie sheet works well. Try to have minimal frost on the meat, as well or it will steam rather than sear.
- 1 8-ounce frozen boneless rib eye steak, about 1 1/4-inches thick, unthawed
- Dry rub of choice
- 2 tablespoons olive oil
- 1 tablespoon butter
- 1 tablespoon bacon fat (or butter or oil)
- 1 sweet onion, sliced
- 4 Shisito peppers (or peppers of your choice), thinly sliced
- Kosher salt (be generous when salting)
Preheat the oven to 450°F. While the oven preheats, season the steak with salt and pepper and/or dry steak seasoning of your choice (Montreal steak seasoning is a good option). Set the seasoned steak aside and place a cast iron skillet on the burner over high heat. Turn the exhaust fan to HIGH! When the skillet is hot, add the fats. You should have about 1/8-inch of melted fat in the pan. Just when it begins to smoke, gently place the steak in the pan. It’s will spatter somewhat angrily. Leave it alone. Don’t move it for 90 seconds. Use a tongs and turn the steak over. After 60 seconds into searing the second side, place the sliced onions and peppers around the steak. Continue to sear for another 30 seconds, 90 seconds on each side. Immediately, slide the skillet into the oven for 8 minutes or until the internal temperature is 120°F on an instant read thermometer. Using a pot holder, remove the skillet our of the oven (the onions and peppers were nicely wilted, but still had some texture) and set aside on a cold burner. Drape loosely with foil and let the steak rest for at least 5 minutes, but 10 is better. Serve immediately after resting.
NOTE: This process really only works well for no more than two steaks, which is perfect for 2-4 people. The steak works best if it’s at least 1-inch thick, but I prefer at least 1 1/4-inch thick.
Adapted from Cook’s Illustrated, September 2014.

Pingback: From-the-Freezer-to-the-Skillet Perfect Steak! — Goddess Cooks | My Meals are on Wheels